

I have been wanting to sew my own Mei Tai baby carrier. I started with my no-sew Baby Wrap and my then newborn benefits it a lot and even my then 3 years old toddler. Last Holy Week I planned of sewing one to be used for our
Visita Iglesia. However, to my surprise, I ran out of time but luckily I
was able to sew one for Easter Sunday.
I used Cavass and Dri-Fit fabric for this project. Followed instructions from various great sewing blogger friends including Teresina with great image instructions and Jessica with easier to understand English instructions.
I will state here the steps but you can also visit those links for more inspiration.
1. Make the pattern: I omit the headrest or neck support for my boy is turning two now. If you want to make this for a newborn or smaller baby and grow with your child you might need to make the back arch up instead of going straight across. Here are the measurements I follow:

3. Cut out the padding for the straps (I used my son's old crib mattress batting): I cut out 8 pieces (4 will be stacked together for each shoulder strap) that are 5 inches by 22 inches long. And 4 pieces that are 5 inches by 28 inches long.
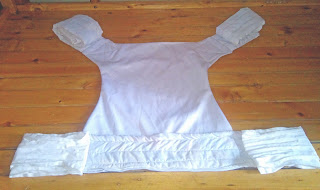
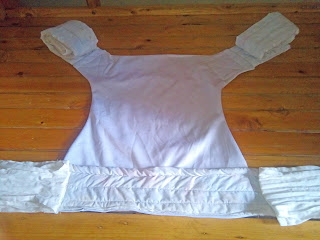
4. Cut out body pieces ON FOLD: you will need 3 of them- one for the inside (where the baby sits), one for the outside (that everyone will see), and an inside layer for durability. Be very careful in laying down your layers because mine turned out wrong. The outer layer becomes the inner/invisible layer.
5. Assemble the padding: place 4 pieces of the same size together and sew a basting stitch so they stay in place. You should have 3 padding bundles when you are done.
6. Make straps: Fold straps in half, right sides together, and sew the length. When done flip them right side out and iron them flat. You should finish with 3 long straps, one for the waist and 2 for the shoulders.
7. Insert the padding: Place the padding in the two shoulder straps about 5 inches from the opening. Place the last bundle of padding in the waist section in the dead center. (I used a safety pin with a string tied to it to pull the padding into the center)
8. Sew the long strips 2 times lengthwise through the center.
9. Layout body pieces like this:

with the straps sticking out the top by 5 inches and right sides of the inside and outside pieces together.
10. Stitch all around the body piece leaving the bottom open: I stitched twice across the straps just for durability.
11. Flip body to right sides out.
12. Tuck in the bottom and sew all around the body piece.
13. Sew the straps inside the body piece: with a square and "x" to help reinforce.

14. Center the waist strap with the center of the body piece and sew a square around the piece.

15. You are done!!
I used mine during Easter Sunday.
Sew Your Own DIY Mei Tai Baby Carrier
 Reviewed by Leonilyn Vitto
on
5/03/2017
Rating:
Reviewed by Leonilyn Vitto
on
5/03/2017
Rating:
Reviewed by Leonilyn Vitto
on
5/03/2017
Rating:


